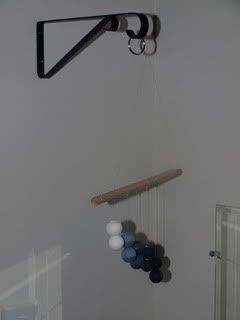
Mobiles are fun and awesome, but they are also REALLY expensive. I almost fell over when I tried to buy a cute one to put over Aidan’s crib when he was a little bitty baby. I suppose its a good thing I didn’t spend the bucks since I’m pretty sure he never actually slept in that cute little nursery I put together, but live and learn I guess.
To the best of my understanding the Montessori mobiles actually have 3 progressions
- Black to White
- Light to Dark of One Color
- Rainbow of Colors
I could be totally wrong about that as I have no infant/toddler Montessori training and my knowledge comes exclusively from the blogosphere, but my *professional* early childhood training (college) tells me that progression makes sense so that is what I will use in my *practical* experiences (parenting). For fun you could maybe add in a warm to cool type progression as well.
This post will be the written description of how to make your own vision mobile at a fraction of the cost of commercially available products. Excluding what I had laying around (tools, etc), I spent less than $10. If you would like to see a photo spread to match the steps, you can view that here.
Materials Needed:
1/4 or 1/2 inch wooden dowel- cut to 12 inches
5 or 10 wooden spheres (any small- medium size)
paint- depending on what mobile you would like to make
fishing line
metal craft ring
plant hook
scissors
drill with the smallest bit available to you
spray clear sealant (optional, but makes everything look more finished)
sandpaper
scissors
needle
- Drill 7 holes into the dowel using the smallest bit available to you. Tim used a 5/32″.
- Drill a hole (same size) through the each of your wooden spheres.
- Sand all wooden surfaces.
- Paint the wooden spheres according to the desired progression. You can use one or two spheres per color. I did two because I liked the way it looked from the side better as my spheres were fairly small
- Allow paint to dry and then spray with a coat of clear sealant. Be sure to read the package for use information on your brand and allow to dry according to package directions.
- Thread fishing line up through the first hole on the dowel, through the craft ring, and back down through the last hole on the dowel. Adjust to desired length and tie off ends. I found the fishing line was easier to tie if I wrapped it around the dowel once or twice.
- Hang the painted spheres from the dowel at the desired length, using the fishing line. You can make them all the same length or at increasing lengths as I did.
- Mount the plant hook on the wall at about thigh height. Be sure to find a stud…a wall stud that is… to make sure it doesn’t fall down.
- Hang the mobile from the hook and watch your little one delight with joy! Logan likes to talk to his.
In theory you could fairly easily change out the spheres without remaking the dowel to change the mobile. My plan is to use the black and white mobile until he seems to be less interested and then change to the light to dark and then finally to the rainbow.
If you make one of these mobiles, I would love to know about it! Even if it is months from now, I’d love for you to blog about it and then come back and share.


Thank you for sharing this! I saw something similar on Sew Liberated and added it to my "figure out how to do" list – you've eliminated the "figure out" part – thank you!! 🙂